A Step-by-Step Guide to Emergency Storm Damage Roof Repair

Storms can strike with little warning, leaving homes exposed to the elements and vulnerable to extensive damage. High winds, heavy rain, hail, and flying debris can all wreak havoc on a roof, compromising its structure and leading to costly repairs if not addressed promptly. For homeowners, knowing what steps to take after such an event can significantly reduce the impact. 

Here’s a clear, actionable approach to storm damage roof repair, ensuring safety, efficiency, and long-term protection.

Table of Contents

Key Takeaways

✔ Inspect the roof safely from the ground using binoculars or a zoom lens

✔ Prioritize safety—never climb on a damaged roof or enter hazardous areas

✔ Document all damage with clear photos, videos, and written notes

✔ Make temporary repairs like tarping and leak control to limit further damage

✔ Hire a licensed roofing contractor with emergency repair experience

✔ File your insurance claim promptly, backed by complete documentation

✔ Schedule professional repairs with a written contract and durable materials

✔ Reduce future risk with regular maintenance and storm-resistant upgrades

Step 1: Inspect Roof Damage Safely

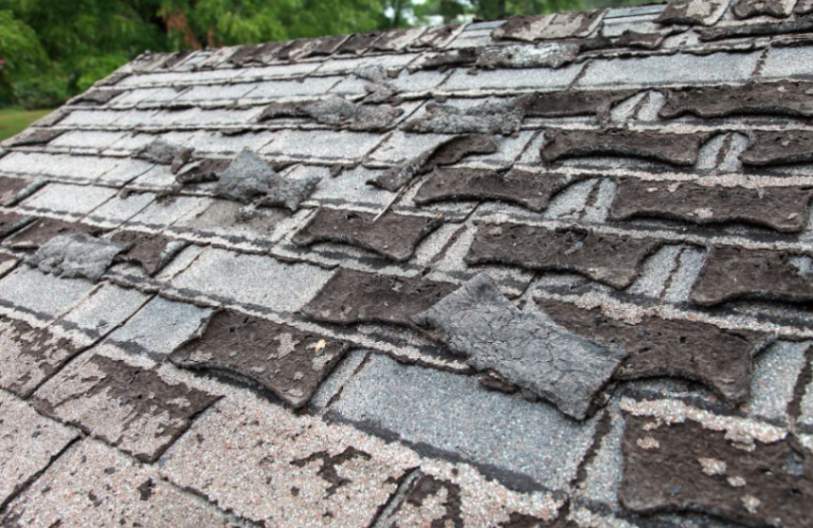
The number of severe hailstorms in the United States has surged in recent years, making roof damage an increasingly common and costly problem for homeowners. According to a study, severe hail events rose by 21% between 2022 and 2024, and the growing size of hailstones is driving up insurance rates in the hardest-hit states. In 2020 alone, the U.S. experienced 4,611 major hailstorms, underscoring the rising frequency and intensity of these weather events.

The first—and most crucial—step after a storm is to evaluate your roof for damage safely and from a distance. A compromised roof may be unstable, and attempting to climb onto it can result in serious injury or exacerbate the damage. Instead, conduct a visual inspection from the ground to identify obvious issues and begin documenting the extent of the destruction.

Begin Your Assessment Safely from the Ground 

  • Use binoculars or a zoom camera: Identify visible damage without needing to get close. Focus on areas with missing shingles, dents, or dislodged flashing.
  • Check for loose or missing shingles: Shingles often tear off in high winds. Look for scattered shingles in your yard as a sign of potential roof exposure.
  • Observe for sagging rooflines or structural dips: These may indicate that the roof deck has been compromised or soaked with water.
  • Scan for fallen branches or debris on the roof: Heavy limbs can create puncture points or collapse sections of the roof.
  • Inspect around chimneys, skylights, and vents: These areas are particularly vulnerable to leaks after a storm and may show signs of flashing damage.

Look Inside for Water Intrusion Signs

  • Water stains on ceilings or walls: Often a direct indicator of a roof leak repair after a storm becomes necessary.
  • Peeling paint or bubbled drywall: These are symptoms of prolonged moisture exposure.
  • Damp insulation in the attic: A strong sign that water is entering from above.

Step 2:Prioritize Safety First

While urgency is understandable after a storm, personal safety should always come before property. Taking unnecessary risks can lead to serious injury, especially with an unstable roof. If the situation feels unsafe at any point, call a professional immediately. Some roof storm damage restoration companies offer 24/7 emergency assessments and can quickly stabilize the situation.

Ensure the Environment Is Safe

  • Wait until all storm activity has ceased: Do not venture outside during lightning, hail, or heavy winds.
  • Look out for hazards around the property: Avoid stepping near downed power lines, sharp debris, or unstable trees.
  • Do not walk on the roof under any circumstances: Even minor-looking damage can hide significant structural problems.

Take Safety Precautions Indoors

  • Turn off the power in affected areas: If there is standing water or active leaks, shutting off electricity can prevent electrocution.
  • Wear protective gear: Use gloves, boots, and a helmet when accessing the attic or checking upper floors for damage.
  • Avoid using ladders in wet or windy conditions: It’s not worth the risk. Instead, wait for a professional wind damage roof repair contractor with proper equipment.
damaged roof

Step 3: Document Everything for Insurance and Repairs

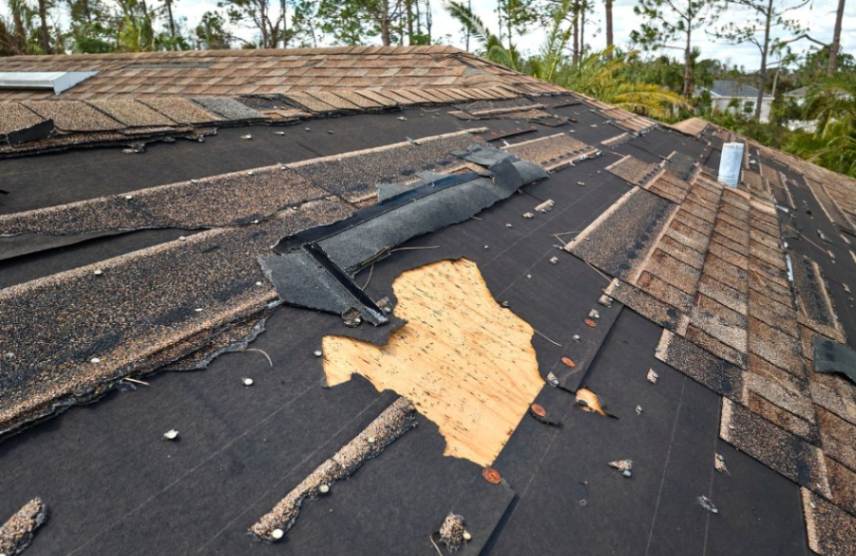
Accurate and timely documentation supports both insurance claims and contractor estimates. It also ensures you won’t miss any areas needing repair during the roof storm damage restoration process.

Document Storm Damage Effectively

  • Take wide-angle and close-up photos: Capture the entire roofline and then zoom in on specific areas of concern.
  • Record short videos if possible: Movement and sound (like dripping water) can help convey the urgency to your insurer or roofer.
  • Write a detailed damage log: Note the date and time of the storm, what type of damage you observed, and any actions taken so far (e.g., tarp placement).

Include Photos and Notes of Key Damage Types

  • Missing or broken shingles – A common consequence of high winds, exposing the underlayment.
  • Dented or detached flashing – Often occurs around chimneys, vents, or roof valleys.
  • Clogged or torn gutters – Prevents proper drainage and may lead to interior leaks.
  • Fallen branches or debris – Potential for punctures or collapsed sections of the roof.
  • Visible holes or gaps – May indicate impact damage from hail or debris.
  • Interior damage (e.g., ceiling stains, peeling paint, mold) – Signs of a roof leak repair after the storm that needs urgent attention.

Important:

Complete this documentation before moving debris or attempting temporary repairs. Adjusters may not accept claims if they can’t verify the original damage. A well-documented case strengthens your position during claims and accelerates approval for storm damage roof repair.

Step 4: Make Temporary Repairs to Minimize Water Intrusion

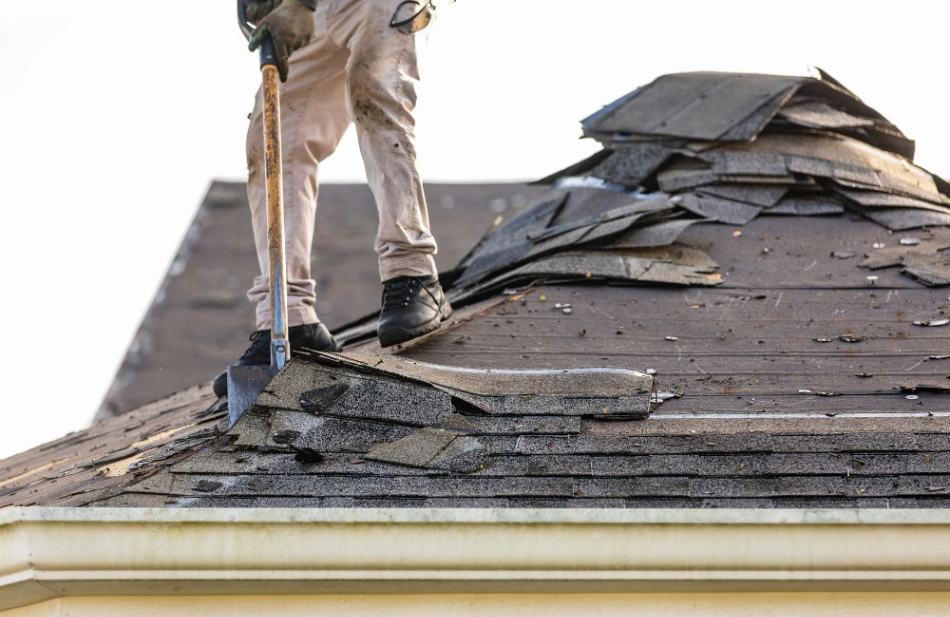
After ensuring the area is safe and documenting all visible damage, homeowners should take immediate steps to prevent additional deterioration. Temporary repairs help minimize risks while waiting for professional storm damage roof repair. They don’t fix the root issue, but they do provide critical protection while professional roof storm damage restoration is scheduled. They help prevent mold, insulation damage and compromised roofing structures from worsening.

Take Temporary Protective Actions

  • Secure a heavy-duty tarp over damaged areas: Use roofing nails or waterproof tape to hold the tarp in place. Extend it several feet beyond the damaged section for full coverage.
  • Use waterproof sheeting or plastic liners inside: Tape plastic sheets to ceilings or walls under leaking areas to protect interior furnishings and flooring.
  • Place buckets or containers under active drips: Prevent water from pooling on floors and damaging subflooring or electronics.
  • Clear gutters and downspouts: Remove leaves, twigs, and debris to ensure proper drainage and reduce water backup near roof edges.
  • Reinforce any loose shingles or flashing if safe to do so: Only if the area is safely accessible, use roofing cement or nails to temporarily secure loosened materials.

Avoid Common Storm Repair Mistakes

  • Don’t walk on the roof to inspect or repair: Even minor damage can make surfaces unstable and dangerous.
  • Don’t attempt to remove heavy limbs or large debris: These can shift unexpectedly and cause injury or additional damage. Leave it to professionals trained in wind damage roof repair.

Step 5: Hire a Trusted, Licensed Roofing Contractor

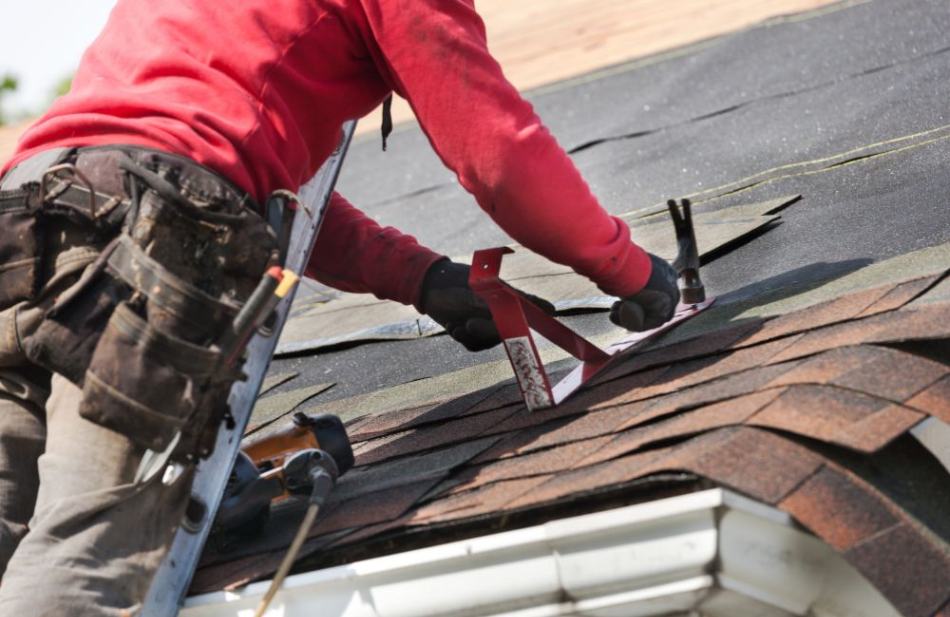
Once temporary fixes are in place, homeowners should contact a qualified professional immediately. A licensed contractor ensures the emergency roof repair is done safely, thoroughly, and in compliance with local codes. A reliable contractor is essential for high-quality roof leak repair after storm incidents and can prevent problems from resurfacing in the future.

What to Look for in a Roofing Contractor

  • Proper licensing and insurance: Verify the contractor is fully insured and certified to work in your state.
  • Storm damage and emergency repair experience: Choose contractors who specialize in storm damage roof repair—they know how to spot both surface-level and hidden issues.
  • Quick response times: Timeliness is critical. Look for companies offering same-day or next-day inspections after major storms.
  • Positive customer reviews and references: Ask for testimonials or check independent review sites to confirm the contractor’s reputation.

Red Flags to Avoid

  • Storm chasers or door-to-door offers: These companies may lack credentials and disappear after collecting a deposit.
  • Extremely low bids: If a price sounds too good to be true, it likely is. Low-cost work often leads to subpar results.

Why a Professional Inspection Matters

  • Identifies hidden damage like cracked decking, torn underlayment, or compromised seals
  • Provides a detailed written estimate needed for insurance claims
  • Guides the next steps for full roof storm damage restoration

Step 6: File an Insurance Claim

Filing an insurance claim promptly is essential for getting coverage for emergency roof repair costs. Most policies cover wind, hail, and other storm-related damage, but claim approval depends heavily on how the process is handled.

Steps to File an Effective Claim

  • Notify your insurance provider immediately: Waiting too long can affect eligibility. Call as soon as damage is discovered.
  • Provide complete documentation: Share your photos, videos, damage logs, and the estimate from the roofing contractor.
  • Request a claim number and adjuster assignment: Keep track of your case for easy reference and follow-up.
  • Be available during the adjuster’s inspection: Walk them through the damage, and if possible, have your contractor present to provide technical insight.

Tips to Streamline the Process

  • Communicate in writing whenever possible: Emails or letters create a record of your conversations and requests.
  • Organize documents in a digital or physical folder: Store your claim details, policy information, and repair estimates in one place.
  • Follow up regularly for updates: Don’t assume the claim is moving forward—check-in to avoid delays.

Important Reminder

Never authorize full repairs until the claim is approved and you understand your policy coverage. Insurance providers may deny coverage for non-covered services or work completed before their inspection. By following these steps, homeowners can ensure their roof storm damage restoration is financially supported and completed without unnecessary obstacles.

roof replacement

Step 7: Schedule Professional Roof Repair or Replacement

With the insurance claim approved and the funding secured, it’s time to move forward with the actual repairs or full roof replacement. This stage is critical to restoring the roof’s functionality and ensuring the home is protected against future weather events. By finalizing repairs properly and choosing durable materials, homeowners protect their investment and enhance long-term safety. This final step in emergency roof repair closes the loop on storm recovery and brings peace of mind.

Coordinate with Your Roofing Contractor

  • Set a project timeline early: Discuss start and end dates to ensure the job fits within your schedule and weather conditions.


  • Request a written contract: A proper agreement should include:


    • Scope of work (repair vs. replacement)
    • Total cost breakdown
    • Timeline and project milestones
    • Material specifications
    • Cleanup and disposal details
    • Warranty coverage


  • Confirm permits and local code compliance: Your contractor should handle any necessary building permits and ensure the work meets municipal regulations.

Decide on Repair or Replacement

  • Repair: Best for isolated damage, such as a few missing shingles or minor flashing issues.
  • Replacement: Ideal when over 30% of the roof is affected or when structural damage is discovered during inspection.

Consider Performance Upgrades

  • Impact-resistant shingles (Class 4-rated): Offer better protection from hail and flying debris.
  • Reinforced flashing and ridge caps: Improve resistance to wind uplift and leaks.
  • Enhanced attic ventilation systems: Regulate temperature and moisture, which extends roof lifespan.

Maintain Regular Communication

  • Stay in touch with both your contractor and insurance adjuster: If change orders or unexpected issues arise, prompt updates prevent misunderstandings or delays.
  • Request a final inspection upon completion: Ensure all wind damage roof repair tasks are finished to your satisfaction and match the contract.

Step 8: Upgrade and Maintain Your Roof to Prevent Future Storm Damage

While homeowners can’t prevent storms, they can reduce the risk of costly damage through preparation, maintenance, and roof upgrades. In 2024, Texas and Kansas reported the highest number of hail events, with 878 and 495 incidents, respectively, indicating regional vulnerabilities to such weather phenomena. Taking preventive action now supports long-term success in future storm damage roof repair situations. Proactive prevention reduces the likelihood and severity of future roof leak repairs after storm incidents. It also extends the life of the roof and minimizes long-term costs related to roof storm damage restoration.

Schedule Routine Maintenance and Inspections

  • Have a professional inspect the roof annually: Pre-storm-season checks catch minor issues early, such as loose shingles, nail pops, or cracked sealant.
  • Check attic insulation and ventilation: Proper airflow prevents condensation, mold growth, and structural rot.

Keep the Roof Storm-Ready

  • Clean gutters and downspouts regularly: Clogged drainage systems can cause water to back up under shingles or leak into the fascia.
  • Trim nearby trees and remove overhanging branches: Limbs can fall during windstorms and cause punctures or collapse sections of the roof.
  • Remove debris and moss from the roof surface: Debris retains moisture, which can lead to premature material failure.

Invest in Storm-Resistant Improvements

  • Upgrade to a fortified roofing system: Includes sealed roof decks, enhanced underlayment, and wind-rated fasteners.
  • Reinforce soffits, vents, and flashing: Strengthened components resist blow-offs and water penetration during high winds.
  • Install storm straps or clips if applicable: These additions anchor the roof to the structure, offering additional protection in hurricane-prone areas.

Adopt an Emergency Response Plan

  • Create a post-storm checklist: This helps you react quickly after a storm hits—document damage, make temporary repairs, and contact professionals.
  • Keep contact info for trusted contractors and insurers: Immediate access to experts saves time when urgent action is needed.

Frequently Asked Questions

How do I know if my roof damage is covered by insurance?

Coverage depends on the cause of the damage. Most homeowner insurance policies cover sudden events like wind, hail, or fallen debris. Damage from neglect, poor maintenance, or aging materials is usually not covered.

What should I avoid doing after storm damage to my roof?

Avoid making permanent repairs before your insurance adjuster inspects the damage. Do not throw away any damaged materials, as they may be needed as evidence for your claim. Also, avoid hiring contractors who lack licenses or insurance.

Can I stay in my house during roof storm damage repairs?

In most cases, it’s safe to remain in the home during minor repairs. However, if there are active leaks, exposed electrical systems, or structural concerns, temporary relocation may be recommended. Always consult your contractor for safety advice.

How long does storm damage roof repair usually take?

Minor repairs can often be completed in a single day. Larger projects or full replacements may take several days to a week, depending on roof size, material availability, and weather conditions. Permits or insurance delays can also affect the timeline.

Will delaying roof storm damage restoration increase costs?

Yes, postponing repairs can lead to further water intrusion, mold growth, and even structural damage. These secondary issues are often not covered by insurance. Prompt action helps keep costs manageable and damage contained.

roof repair

Need Emergency Roof Repairs? Contact Roofer of Wappingers Falls LLC Today

If your roof has been damaged by a storm, don’t wait until small issues turn into costly repairs. Roofer of Wappingers Falls LLC provides trusted, timely, and professional storm damage roof repair and emergency roof repair services for homeowners in Wappingers Falls, NY. With expert crews ready to respond, we help you restore your home quickly and safely. 

Beyond storm-related repairs, Roofer of Wappingers Falls LLC also offers a full range of roofing solutions, including roof installation, roof replacement, shingle roofing, flat roofing, metal roofing, skylight repair, and gutter installation. Whether you’re dealing with a roof leak repair after a storm or planning an upgrade to more resilient materials, our team is here to help. Residents of Wappingers Falls, NY trust our licensed and insured professionals for high-quality work and unmatched service. 

For dependable wind damage roof repair, thorough roof storm damage restoration, or new roof construction, choose the local experts who know your needs. Contact Roofer of Wappingers Falls LLC in Wappingers Falls, NY today and get your free estimate!